Phone cameras are not to be ignored anymore. Industries such as Apple and Samsung put a lot of effort into cameras, and it is now possible for non-professional videographers to shoot some amazing shots on their phones. But before you start shooting random shots with your phone and wait for time to improve your work, here are some tips to shoot professional cinematic videos with an iPhone to shorten the process.
Adjust Resolution & Frames per Second
1. Resolution
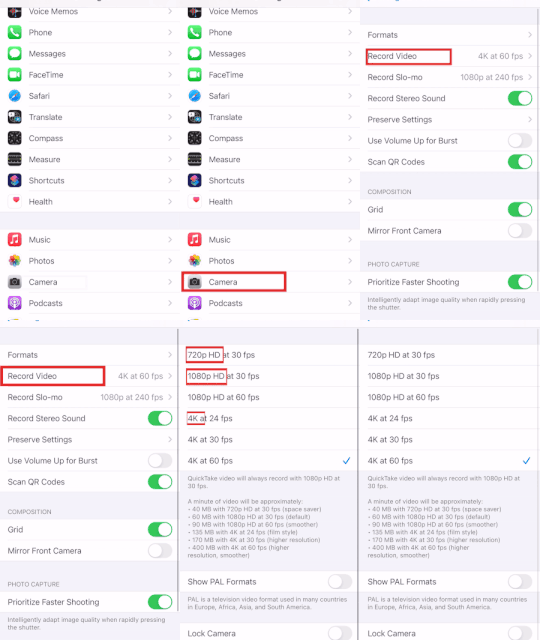
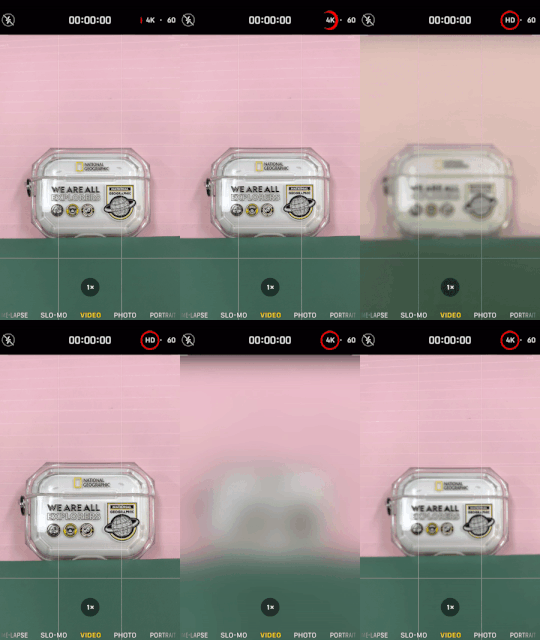
Resolution (aka. quality) is the first thing you should change for perfect videography. There’s no perfect resolution setting but I recommend you to set it as high as you can since footage with high resolution is always available to be streamed on a small monitor without any problem whereas footage with lower resolution is cracked on a large screen. Simply think about the YouTube video with a weak wifi signal. However, setting high resolution means it takes more space in your mobile phone. So please make sure that you have enough storage capacity before taking videos.
How to change resolution:
- On the Settings app: Open Setting app > Tap Camera > Tap Record video > Select option you want
- On the Camera app: Open Camera app > Tap the option on the upper left corner
2. Frames per Second(fps)
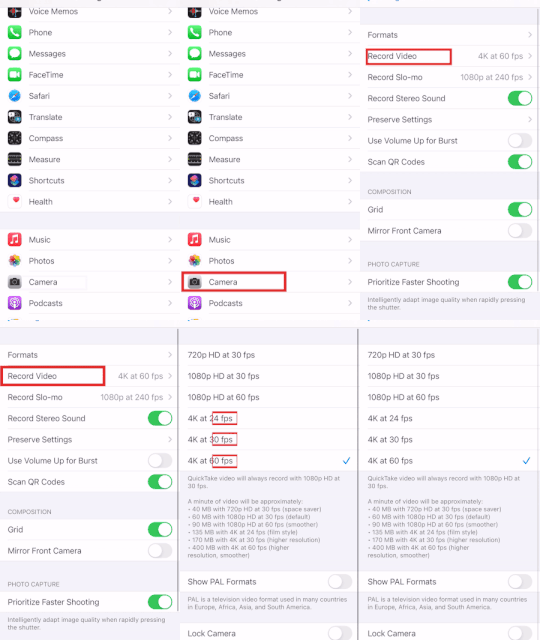
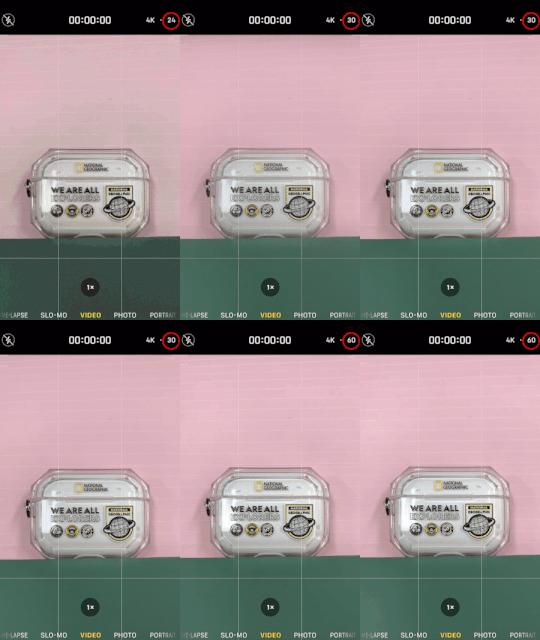
Many phone camera users do not realize that one can adjust the fps as well. For those of you who are not familiar with the term fps, it is just an abbreviation for frames per second. So when you are adjusting fps, you are choosing how many frames you want to be shot in a second. Videos differ depending on what fps you set up. The higher the fps is, the smoother video recordings would appear. If you are happy with what you usually see in TVs or theaters, it is best you set it up to 24 – 30fps, and if you want to create a slow-motion video, set it to the highest number. It might seem insignificant, but I assure you, you will see the difference.
How to change Frames per Second
- On the Settings app: Open Setting app > Tap Camera > Tap Record video > Select the option you want
- On the Camera app: Open Camera app > Tap the number on the upper left corner
Lock your auto-focus/auto-exposure
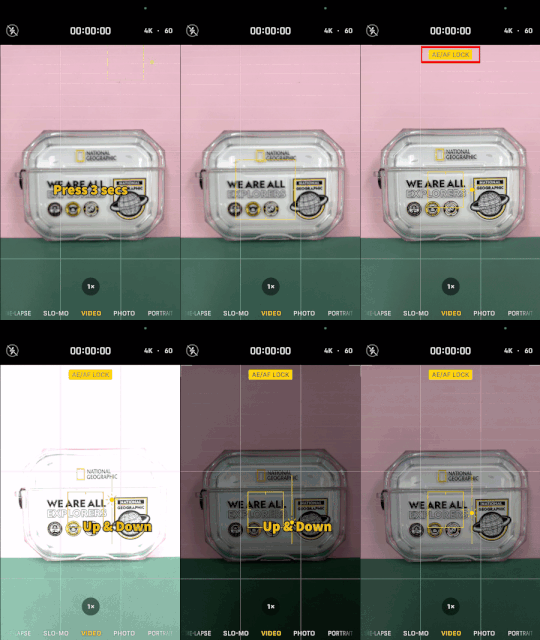
Phone cameras are always on auto-focus(AF) and auto-exposure(AE) if you don’t lock them up. These auto functions can be quite comfortable to use for daily videos, but they could be not suitable for cinematic footage. Focus keeps changing every time you move, and sometimes it goes off focus, making the footage way too exposed to light. So in order to make your video smoother without light and focus jumping up and down, you want to lock them.
How to lock auto-focus/auto-exposure
- Open the Camera app > Press the subject you are willing to shoot for 3 seconds until the small yellow box starts to flash with AF/AE Lock> Adjust the exposure(sun icon) to the level you want to feature
How to adjust exposure
- Tap on the screen on the point of focus > Tap on sun icon > Move your finger up/down to brighten/darken the exposure
Put grid on camera
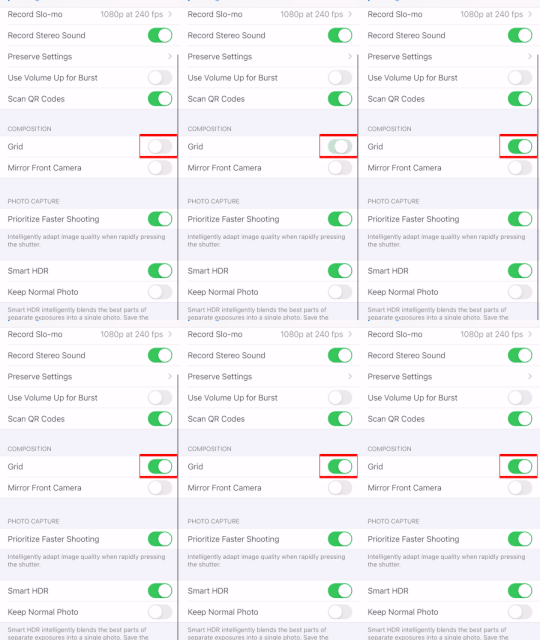
If you have decided what to take, it’s time to think about where to put it. We call this composition, and the grid will be a perfect guideline for you. The grid is directly related to the Rule of Third that has been used in art since the 18th Century. Since then, it has been the second nature of photographers and videographers. If you know any movie of Wes Anderson, a true master of symmetry shots, you would know how important the Rule of Third is.
The Rule of Third is the concept of dividing your shot with a 3×3 square grid and placing your subject at the intersection of those divisions. Depending on the place of the subject, the whole impression of your video would be totally changed. Of course, there are no rules for composition. However, whenever you lost your way while adjusting the camera angle, the grid will suggest several options that you can take for a better shot.
How to put grid
- Open the Settings App > Tap Camera > Enable Grid
Use A Tripod/Gimbal
One way to get a perfect shot is to stabilize your camera completely. Phones these days are already equipped with stabilization, but it can’t be better than putting your phone in a perfectly stabilized state. You might say, my hands don’t shake as much, they are steady. But once you shoot a video with your bare hands, you will be surprised at how shaky the outcome looks. Tripods for phones are not that expensive, being 20 bucks on average. Tripods can come in handy especially when you are shooting a timelapse, or at one spot.
If you wish to shoot videos with some movements, I recommend you use a gimbal. Of course, you can always ninja walk, keep your arms close to your body and everything, but as I said, it can’t be better than when you use the equipment. Gimbals are more expensive than tripods, but if you can’t afford gimbals, you can always make one. Youtube is full of DIY gimbals and some of them are quite good.
Alternative to Tripod/Gimbal
Don’t be sad for not having any Tripod/Gimbal. Here is an idea that you can take the stable shot by using things around you. If you’re not willing to purchase gears first, you can try alternatives on the list below, and see how it works. Even alternative’s also good enough to make your videography way better.
1. Book-Alternative to Gimbal
To take the stable shot while moving, you definitely need something to place your shaky hand on. Book is a great example that you can get help from but it doesn’t mean that ONLY book can be the alternative. Find sturdy stuff around you that can play a role as a dolly. Shopping carts, skateboards, wheelchairs, anything that cut down on shakiness. They will surprise you by creating a smooth shot even with a mobile phone.
3. Stick-Alternative to Gimbal
The reason why professionals use gimbal is to make the stable shot even with the movement since it automatically stabilizes the shakiness on your footage. As an alternative, any stick would be available but I personally recommend a selfie stick. It’s way cheaper than a gimbal and at the same time, super convenient to adjust to any model of mobile phone.
2. Cup-Alternative to Tripod
Tripod is usually used for static shot such as timelapse, interview, etc. Especially, if you’re thinking about to creat your Youtube channel, tripod would be necessary. You can make angle by customizing paper cup, plastic bottle. What could be more accessible than this?
Bonus tip
There are some obvious, yet important rules to shoot the best quality videos. First, clean the lens with a soft cloth. A lot of people do not recognize the smudge on their lens and shoot videos. You will be surprised at how clear the video looks after you clean the lens for a change. Second, avoid backlighting. Never have a light source, a window bright with sunlight perhaps, behind the subject. Your subject will look dark and silhouetted because the light source is all behind the back. Instead, try to have the lighting at the side or in front of the subject. Lastly, try using slow-mo or time-lapse effects in your camera. Make use of what your phone camera has to offer. Choose the right effect according to what you want to shoot.
Phone cameras are capable of shooting higher quality videos than you think. Actually, professional movie directors have used iPhones to shoot short films, and you wouldn’t have known if they didn’t tell you. There are also many mobile videographers who manage to create some amazing work with their phones. Don’t pout on not having professional gears, all you need is practice and some good tips. When you’re done with practicing, you can also make extra money by selling your footage on a stock footage platform. So, what are you waiting for? Just give it a shot. Now.
Read more related articles here!
- YouTube Mobile Videography: Top 5 Creators to the Rescue
- Top 5 movies filmed with iPhones, from Zack Snyder to Michel Gondry
